Two days after Braga bid adieu to their last hopes of remaining in the Portuguese title race, it's time to dissect the motives that led to Benfica's superiority throughout most of the match - and why José Peseiro's team are less solid than Braga's versions over the last few years.
- 1. The 4x3x3.

Without Cardozo, Lima was Benfica's only striker - a departure from their usual ways. With the introduction of Gaitán, Benfica were set up in a 4x3x3, with Jorge Jesus clearly aiming to control the centre. Matic, Enzo Pérez and Gaitán often formed a perfect triangle. While both Argentinians were authorized to push forward almost at will, Gaitán had the freedom to roam wherever he saw fit, in order to overload Braga's defence - in fact, he would turn out to be the match's decisive player.
The picture also shows that, even though Braga were more expectant than usual, Mossoró and Éder would often remain up front, removed from the midfield contest. Custódio and Hugo Viana, not the fastest players around, were clearly not enough for Matic, Gaitán and Enzo Pérez, not to mention Lima's movement.
- 2. The 4x1x4x1 in the defensive phase.

Not only did Jesus prefer a 4x3x3 while attacking, he also chose a different shape to defend at Braga - in this case, 4x1x4x1, a typical defensive shape for teams that play in a 4x3x3. Certainly aware of Mossoró's threat, Jorge Jesus wasn't willing to let the Brazilian run the show with quick breakaways. With Matic behind Enzo Pérez and Gaitán, Jesus made sure there was always a player between the lines, Mossoró's preferred area of dominance.
This simple tweak kept Braga from succeeding in their quick transitions, particularly because none of Ruben Amorim, Viana, Custódio or Alan (nowadays, at least) are quick enough to accompany Éder or Mossoró in their forays. Braga would actually manage to get the ball out to Éder, who would find himself alone and have no other option but to try his luck, even when the circumstances did not recommend it.
- 3. Benfica easily circumvent Braga's defence.

Braga's more cautious approach did not necessarily translate into a better defensive positioning. In fact, Benfica was not too troubled by their opponents' strategy and often found a way around it. In this particular case, Lima drops back from the centre-back (who tries to stick close to him) to collect the ball. He then gives it back to the unmarked Enzo Pérez, who in turn gives it to Gaitán.

After delivering the ball to Enzo Pérez, Lima quickly turns and exploits the space behind his marker. Without anyone to mark him (Viana tries to pressure Enzo Pérez, but to no avail), Gaitán has all the time he needs to pick his pass and play Lima in.
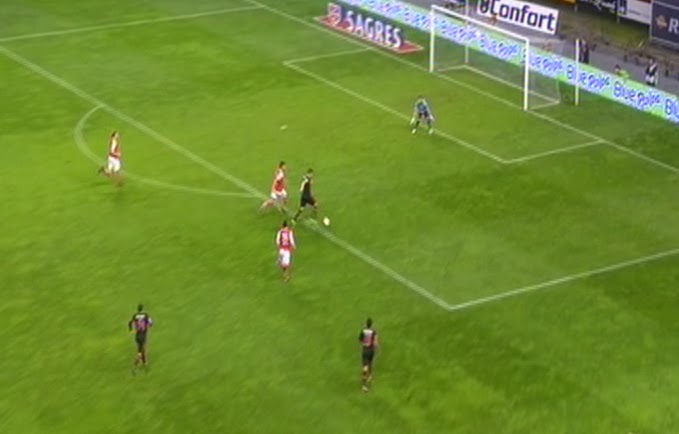
While this particular play did not yield a goal, it was a very good example of how Benfica saw nothing wrong with Braga's positioning.
- 4. Salvio, the wingman.

Benfica ruled the match for approximately 75 minutes. Salvio, in particular, was the main enforcer, despite going against Ismaily and Ruben Amorim, supposedly deployed on the left to stop the Argentinean winger's threat. In the first picture, the ball gets to Salvio, who wastes no time sending it Gaitán's way. Lima's movement dragging the centre-back is most important. With Ismaily focused on Salvio and the centre-back on Lima, Gaitán (red) sprints past Hugo Viana and gets the ball in space.

Here, Gaitán (red) is once again able to pick his pass. By faking to check to get the ball, Lima confuses every Braga defender and Salvio (blue) will be free in the centre of the box.

Despite the presence of five defenders in their own box, Salvio will be able to shoot and collect the rebound to his own shot.
- 5. Braga's poor defensive transitions.
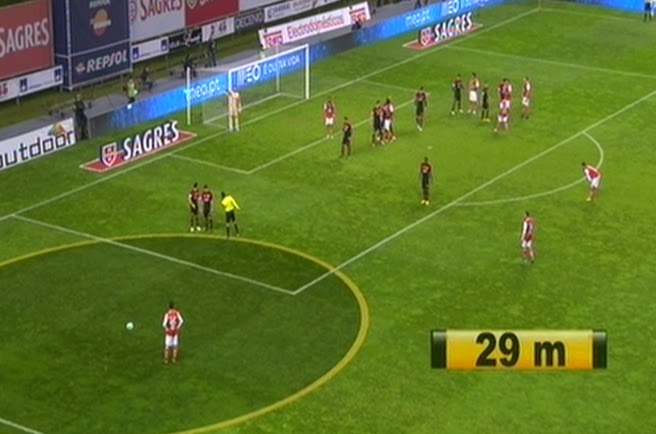
First things first. See if you can count the number of Braga players in and/or around the box. In a potentially advantageous play for them, Braga have no less than nine players directly involved - which means there is only one defender and the goalkeeper behind this picture.
When the free kick is taken and it goes wrong, Braga immediately have four players in front of the ball, besides some who will only trot back.
Three seconds after the free kick, Benfica are already up 3v2. Remember, the play was originally intended to pose a threat to Benfica.
Eight seconds after a potentially dangerous free kick in Braga's favour, Benfica are about to enter their opponents' box. Lima would eventually score the Eagles' second, thanks in part to Haas' less than stellar pressing and Beto's fluffing.
- 6. Braga take 76 minutes to commit men forward.

After finding themselves trailing and with not many chances to get back into the match, Braga looked alive the very minute João Pedro came on for Ruben Amorim. It was basically the first time José Peseiro's charges insisted on driving forward. In the case of Braga's goal, Éder dropped back and, unlike previous situations, actually had someone exploiting the space he had just vacated. João Pedro (red) intelligently attacks the space between centre-back and full-back.

The second picture shows how João Pedro (red) is sprinting unmarked to connect to Éder's lobbed pass.

Keeping calm under pressure, João Pedro gets Artur out of the way and puts the ball in the back of the net. Braga had just pulled one back, but it was too little, too late.
No comments:
Post a Comment